I thought that it would be a good time for some shameless self promotion!
No, seriously, I thought it would be nice to remind my readers of the most read posts of last year and show the posts to any new readers who might enjoy them.

Showing posts with label Recipe. Show all posts
Showing posts with label Recipe. Show all posts
Thursday, 8 January 2015

Thursday, 31 July 2014
Tuna pasta salad

I love having meals that can be thrown together quickly for nights where we are extra busy as it saves us from relying on a take-a-way which saves us money. It is also much healthier then most take-a-ways too and as I am a self confessed control freak knowing I have something quick and easy makes me feel much more in control of things which keeps me happy!
Sunday, 27 July 2014
Mango upside down cake
 We decided to try a new twist on an old favourite so we substituted the well known pineapple for mango to see what it would be like and I have to say, it works really well. In fact my whole family said that they prefer the mango to pineapple in this cake and Faith really enjoyed cooking it with me.
Wednesday, 18 June 2014
Sausage herb crust pie.
Ingredients.
8 Sausages.
1/2 a chopped onion.
A tin of baked beans.
125ml water.
225g self-raising flour.
75g Stork or similar.
1 tsp mixed herbs.
A little milk.
Saturday, 31 May 2014
Themed family fun - French week
 |
| Image by artur84 courtesy of freedigitalphotos.net |
Welcome to French week.
Thanks so much to my two lovely linkers from last week, so nice to have your support as this linky is taking longer then I anticipated to attract linkers.
This week inspired by France, we decided to have a go at some french baking.
Thursday, 29 May 2014
Peanut butter chocolate brownies.

I love to bake and I adore the combination of peanut butter and chocolate! With Chloe's 15th birthday coming up, I thought that I would make some peanut butter chocolate brownies, as I know that they are one of Chloe's favourite cakes that I bake. The recipe is quite naughty but everyone deserves a treat now and again!
Wednesday, 14 May 2014
Easy fish pie recipe
Ingredients
* 4 White fish fillets (I use frozen but you could use any type of fish frozen or fresh)
* 3 Medium potatoes.
* Broccoli (Again I use about half a bag of frozen but you could use fresh)
* Cheese sauce packet mix (I use one from Asda that just requires boiling water)
* Large handful of grated cheddar cheese.
Saturday, 3 May 2014
Themed family fun - Blue week.
Welcome to blue week!
 This week we decided to make some biscuits and decorate them with blue icing and sugar decorations as we didn't have very much time and thinking of something inspired by the colour blue was much harder then I had anticipated!
 Saturday, 5 April 2014
Themed family fun - Pig week

Welcome to pig week! This week we have made paper plate pigs and cup cake pigs and we have had loads of fun.
Paper plate pigs - These are so simple to make and so much fun.

All you need is:
* Paper plate.
* Pink paint and paint brush.
* Pink paper.
* Black pen.
Just paint the plate completely pink. Cut a circle of pink paper for the nose and colour in two black dots, cut two small dots and colour in black for the eyes and cut out two triangles for the ears. Then stick all the pieces to the plate to make a pigs face. You will not need any glue as the paint is still wet it will stick when it dries.


Pig cupcakes.

You need:
* Cup cakes.
* Icing sugar.
* Pink food colour.
* Marshmallows.
* Red lace sweets or similar.
* Smarties or similar.
* Icing writing pens.
To make.
Make some pink icing with the icing sugar, water and pink food colour.
Cover a cake in pink icing.
Cut a marshmallow in half and place one half in the middle of the cake to make a nose. Cut the second half into two to make the ears. Place these at the top of the cake.
Add smarties for the eyes and a small piece of lace for a mouth.
Finally add two dots of writing icing on the nose and a dot on each smartie for the eye balls.

I hope that you have enjoyed reading about what we did for pig week and if you have joined in too then I would love for you to link up your posts below on the themed family fun linky.
Don't forget to come back on Monday to find out the next theme and if you would like more information on the linky take a look at the link at the top of my blog.
Monday, 10 March 2014
Fun with food
Making food fun always goes down well with young children especially when they are going through a phase of being fussy, I remember when Faith was going through a phase of not wanting to eat anything healthy so I use to make faces with her salad and then she would eat it!
Anyway, when I heard that Sony had teamed up with tots100 to make a blogging challenge of creating a foodimal inspired by the recently released cloudy with a chance of meatballs 2 on Blu-Ray and DVD I decided to have a go.
 Welcome to my baked hedgehog!
This was very easy to create and Faith absolutely loved eating it which is always a bonus. I've included a quick guide to how I made it, in case you would like to have a go.
Ingredients.
* Baking potatoes.
* Tuna in spring water or brine.
* Salad cream.
* Cherry tomatoes.
* Cucumber.
Method.
1) Wash and dry the baking potatoes and then bake.
2) Drain the tuna and then mix with the salad cream (I normally use about 1 tablespoon per tin of tuna, but this really comes down to your own taste)
3) Make a slit in the potato but do not cut all the way through.
4) Fill in the gap with the tuna mix.
5) Cut the cucumber into triangles and arrange on top of the tuna to look like spikes.
6) Finally secure the tomato onto the front of the potato with a cocktail stick to make a nose and add a squirt of salad cream to make the eyes.
Saturday, 8 March 2014
Themed family fun - Dog week.
Welcome to dog week, the first week of my new linky 'Themed family fun'.

This week we watched a movie that had a cast of dogs, made pictures of dogs and cooked puppy cupcakes.
The movie.
Disney's treasure buddies is the film that we chose to watch together as a family as we have seen a few of the buddies films in the past and always enjoyed them, so when thinking of a film that contained dogs, it was the first film that we thought of.
For those of you that have not heard of the Disney buddies series of films, the buddies are five puppies named Budderball, B-dawg, Buddha, Mudbud and Rosebud which are the main characters of each film and they can talk.
The treasure buddies film was made in 2012 and the story is told by a monkey named Babi who is telling the story of how he met the buddies to his nephew. The film centres around a search for Queen Cleocatra's tomb and has a comical Indiana Jones style theme and there is even a talking camel!
Darren, Faith and myself all enjoyed the film very much and Faiths favourite character was actually Babi the monkey which did surprise me as she is a huge dog fan.
Overall, I would recommend a viewing if you have young children as my two teenagers were not so impressed.
Drawing dog pictures.
We decided to have a go at drawing a dog as Faith got a lovely book for her birthday that teaches you to draw lot's of different things including some different types of dogs. Faith was really good, however my efforts were not so good so in the end I decided to go back to my simple dog head drawing for my final piece! Faith decided to draw a poodle for her final piece and I know that I am biased but I think it is really good for a just turned 6 year old. We then mounted them onto a piece of yellow card.


 We found this recipe in an old Annabel Karmel cookbook and then adapted it to our tastes and what we had, as for the ears you were meant to use langue du chat biscuits but we couldn't find any shops that sold them.


 -Make some icing with icing sugar and a little water.

I hope you have enjoyed reading what we got up to on our dog week and if you have joined in this week then I would love for you to link up your post on the linky below.
For more information on this linky have a look at my page at the top of my blog.
Don't forget to check back on Monday to see what the next theme will be!
This week we watched a movie that had a cast of dogs, made pictures of dogs and cooked puppy cupcakes.
The movie.
Disney's treasure buddies is the film that we chose to watch together as a family as we have seen a few of the buddies films in the past and always enjoyed them, so when thinking of a film that contained dogs, it was the first film that we thought of.
For those of you that have not heard of the Disney buddies series of films, the buddies are five puppies named Budderball, B-dawg, Buddha, Mudbud and Rosebud which are the main characters of each film and they can talk.
The treasure buddies film was made in 2012 and the story is told by a monkey named Babi who is telling the story of how he met the buddies to his nephew. The film centres around a search for Queen Cleocatra's tomb and has a comical Indiana Jones style theme and there is even a talking camel!
Darren, Faith and myself all enjoyed the film very much and Faiths favourite character was actually Babi the monkey which did surprise me as she is a huge dog fan.
Overall, I would recommend a viewing if you have young children as my two teenagers were not so impressed.
Drawing dog pictures.
We decided to have a go at drawing a dog as Faith got a lovely book for her birthday that teaches you to draw lot's of different things including some different types of dogs. Faith was really good, however my efforts were not so good so in the end I decided to go back to my simple dog head drawing for my final piece! Faith decided to draw a poodle for her final piece and I know that I am biased but I think it is really good for a just turned 6 year old. We then mounted them onto a piece of yellow card.
Cooking puppy dog cakes.
We found this recipe in an old Annabel Karmel cookbook and then adapted it to our tastes and what we had, as for the ears you were meant to use langue du chat biscuits but we couldn't find any shops that sold them.
Ingredients.
For basic cupcakes.
- 100g Stork or similar.
- 100g caster sugar.
- 100g self-raising flour.
- 2 eggs.
- 1tsp of baking powder.
- 1tsp of vanilla essence.
To decorate.
- A tube of smarties or similar.
- A packet of giant chocolate buttons.
- Icing sugar.
- Writing icing.
- Rich tea finger biscuits.
Method.
1) Pre-heat the oven to 180.
2) Cream together the butter and sugar in a bowl.
3) Add the eggs one at a time and mix well.
4) Mix in the Vanilla essence.
5) Fold in the flour and baking powder until combined.
6) Spoon into cake cases and bake for 20 minutes in the centre of the oven.
To decorate.
-Make some icing with icing sugar and a little water.
-Cover the top of each cake with the icing.
-Use a smartie for the nose and one of the eyes.
-Use a giant button for the other eye.
-Put a biscuit on each side to be the ears.
-Finally use the writing icing to add dots for the eyeballs and a mouth.
I hope you have enjoyed reading what we got up to on our dog week and if you have joined in this week then I would love for you to link up your post on the linky below.
For more information on this linky have a look at my page at the top of my blog.
Don't forget to check back on Monday to see what the next theme will be!
Saturday, 1 March 2014
Chilli beef pancakes.
Chilli beef pancakes are a great dinner to have on pancake day or any day you like as it is a lovely low cost dinner to have if you are feeding your family on a budget.
 Ingredients.
250g beef mince.
Onion - chopped.
Pepper (any colour of your choice) - deseeded and chopped.
A tin of chopped tomatoes.
A tin of red kidney beans.
A tin of baked beans.
1 - 2 tsps. of chilli powder (I use mild but you can use whichever strength you like.)
Pancakes
150g plain flour.
4 eggs.
400ml of milk.
Cheese - grated to serve.
Method.
 1. Dry fry the mince and onions to brown and then drain away the excess fat.
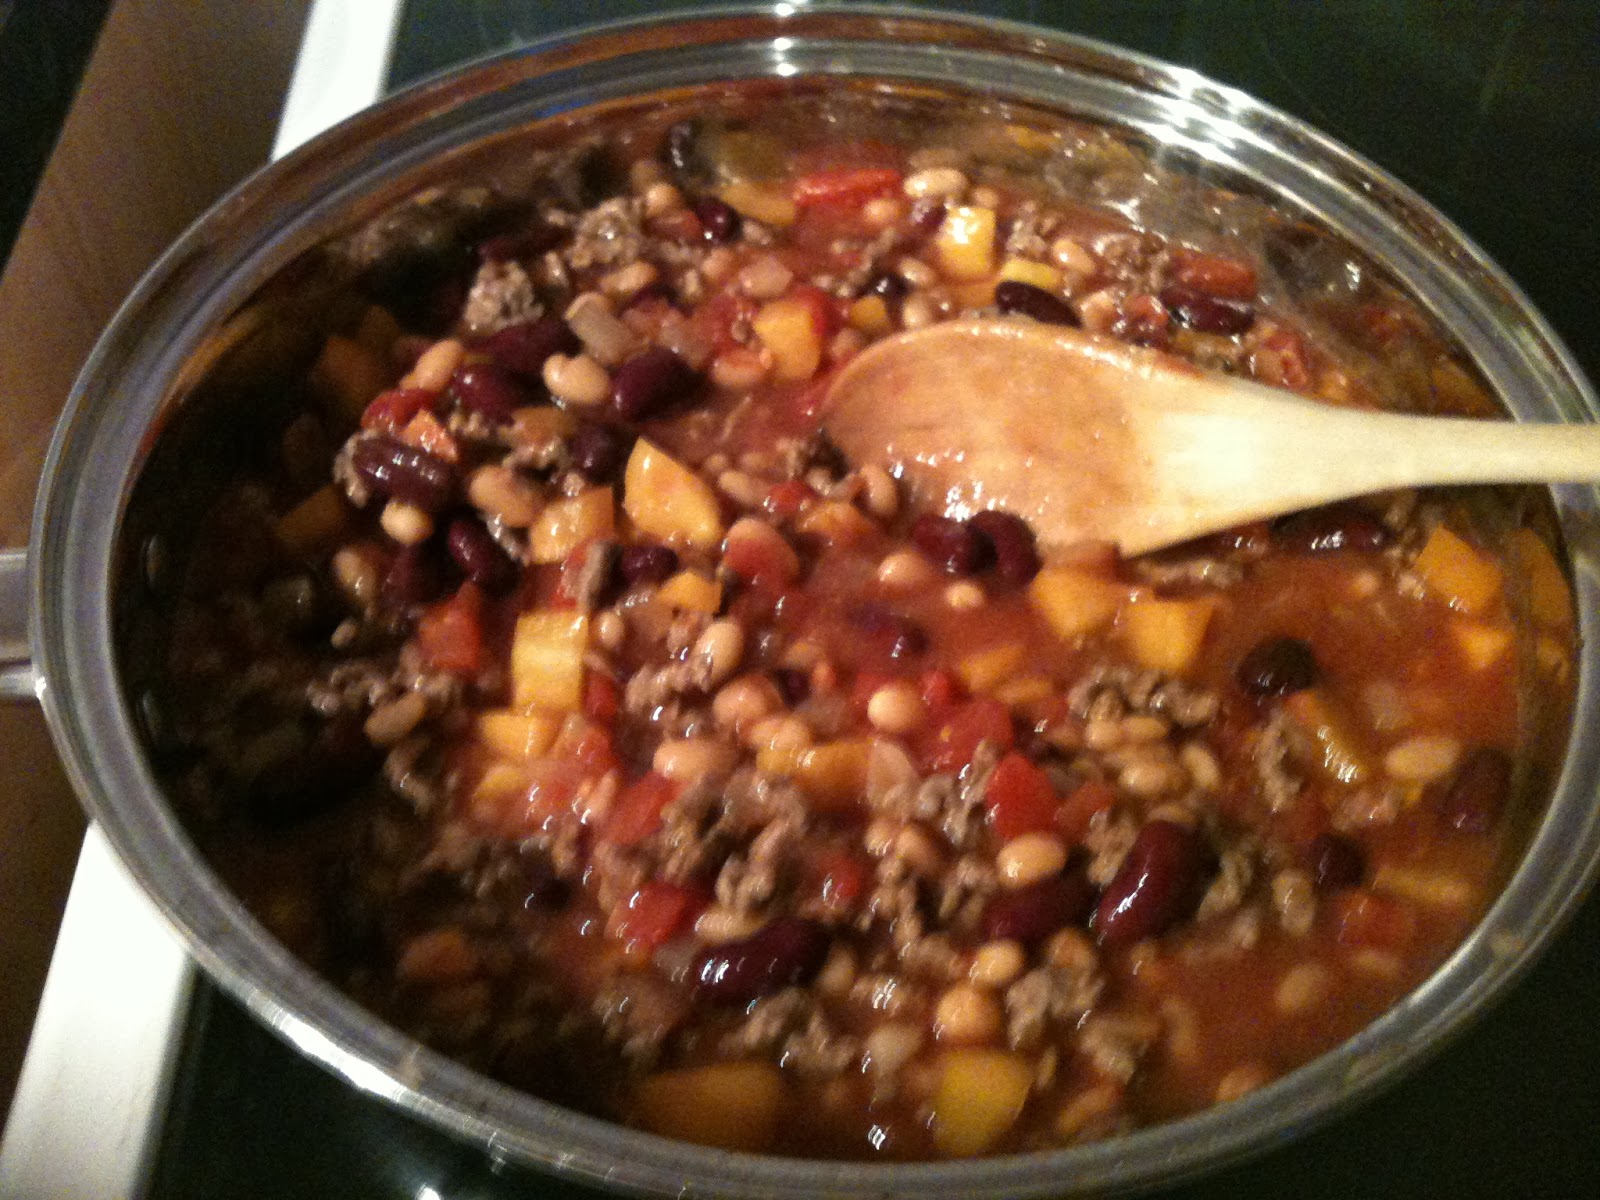 2. Add the kidney beans, baked beans, chopped tomatoes, chopped pepper and chilli powder.
3. Simmer for 20 minutes.
4. Meanwhile make the pancakes.
- Put the flour and the eggs into a bowl.
- Add half the milk and mix with an electric whisk.
- Add the rest of the milk and mix again.
 - Fry the pancakes making them a little thicker then normal pancakes - it normally makes between 8 and 10 pancakes and put the pancakes on a serving plate.
 Dish up the chilli and pancakes along with the cheese and let everyone serve themselves.


 This post is an entry for the #ShortcutEggsperts Linky Challenge sponsored by British Lion Eggs. Learn more and find recipes at http://www.eggrecipes.co.uk/mainmealsinminutes
Monday, 17 February 2014
My favourite winter dinner
The winter is my favourite time of year for food as you get to eat lovely warm comforting food and it tastes so good! My absolute favourite meal to eat at this time of year is my home made Shepherds pie. It is such a great dish and so easy to make, it is low cost and it is also a really good dinner for hiding loads of vegetables in so your children eat them with out even realising it!

Here is my recipe to make it for your family.
Shepherds pie.
Ingredients.
 500g mince beef.
- White potatoes.
- 3 large carrots.
- 2 Leeks.
- A tin of baked beans.
- A tin of chopped tomatoes.
- A small chunk of cheese.
To make.

1. Peel and chop the potatoes and put them on to boil until tender.
1. Peel and chop the potatoes and put them on to boil until tender.

 2. Wash the leeks and chop into small slices and then wash and peel the carrots and chop into small chunks. The great thing about this recipe is that you can use different vegetables if you like, whatever you have in the fridge. This step is also great for little people to help too.
3. Using a large pan, dry fry the mince until brown on a high heat setting on your hob.
4. Drain out the excess fat and then return to the heat.
 5. Add the carrots and leek and cook for another 4 or 5 minutes so that the vegetables are softened but not brown.
6. Add the tomatoes and baked beans and simmer on a medium heat for another 5 minutes.
 7. Meanwhile drain the potatoes and mash them, adding some butter and milk to make smooth mashed potatoes.
 8. Pour the mince mixture into a large casserole dish and then top with the mashed potatoes. I just love all the colours in the mixture!
 9. Finally grate the cheese and sprinkle on top of the potatoes.
10. Bake in the centre of a preheated oven on 180 for one hour.
Serve with a selection of extra vegetables.
This is my entry into the co-op electrical competition to win £750 to spend with them. Details of this competition can be found on there website here if you would like to enter or find out more.
This is my entry into the co-op electrical competition to win £750 to spend with them. Details of this competition can be found on there website here if you would like to enter or find out more.
Sunday, 16 February 2014
Non-alcoholic cocktails
 These are such good fun to make for a child's birthday party as they make them feel very grown up, but they are also good for any occasion for drivers or non drinkers such as Christmas parties and what not.
I got some lovely plastic cocktail glasses from pound land which were great value as you got 8 in a pack. They also had a pack of cocktail umbrellas in there too which I also used.
 I coloured some sugar to put around the edge of the glasses and this was really easy. You just need to put some granulated sugar into a bowl and then add your desired colour in food colour a drop at a time. After one drop mix it up and keep mixing for quite a while and you will see that the sugar will gradually take on the colour. Then add another drop and mix again until you are happy with the colouring. You can then keep the sugar in an air tight container for up to two days in the fridge if you want to make it ahead of time.
You then simply wipe some water or lemon juice around the edge of the glasses and then dip the rims into the coloured sugar. I did find that this works much better on proper glasses as when using the plastic ones it didn't seem to stick very well but at a children's party they don't really care!
I made two different cocktails.
Appleenie
One part apple juice and one part lemonade. I then stuck a red grape onto the cocktail umbrellas and they were done.
Tropical bomb.
One part strawberry, grape and kiwi juice (or similar) and one part vimto. I then stuck a chunk of pineapple onto the end of a cocktail umbrella and again they were done.
So there you have it, two super easy to make non-alcoholic cocktails that were loved by everyone and that look great.
Saturday, 8 February 2014
Buckets of popcorn cupcakes

Buckets of popcorn cupcakes.
At my daughters 16th birthday party I made buckets of popcorn cakes for when they watched their movies. If you would like to make some the recipe is below.
Ingredients.
- 100g stork or similar.
- 100g caster sugar.
- 100g self-raising flour.
- 2 eggs.
- 2-3 drops of vanilla essence.
- 5g baking powder.
- a splash of milk.
- Chocolate fudge icing (I used Betty Crocker but you could make your own or even use different fillings such as chocolate spread, jams or toffee sauce.)
- Vanilla frosting (again I used Betty Crocker but you can use whatever you like)
- Toffee popcorn.
To make the buns.
- Cream together the butter and sugar in a bowl.
- Mix in the eggs one at a time.
- Fold in the flour and baking powder.
- mix in the milk and vanilla essence, being careful not to mix too fast as you do not want to beat the air out of the batter)
- Spoon into 12 cases and bake in a preheated oven at 190 for 15 minutes on the middle shelve.
To decorate.
I used a red pen to colour in red stripes onto the cupcake cases as I was short on time and I did check that the pen ink wasn't seeping through onto the cakes but what I had planned to do if I had not been short on time was either to make some cardboard sleeves with red and white stripes to wrap around the cakes or cut the tops off some white paper cups and then colour in red stripes and place the cupcakes into these. However you decide to do it, the idea is that the outside of the cake looks like a popcorn bucket.
You then cut out a circle from the middle of each bun and fill with your choice of filling and then place the pieces of cake back into the cakes so you can not see that they have been filled.
Then use your vanilla frosting to ice the cupcakes and place the toffee popcorn on top.
*I made these the day before the party and I did find that the popcorn went a bit soggy so it would probably be better to make the cakes and fill them and then add the icing and popcorn just before you serve them if you want to avoid having soggy popcorn. Luckily no one minded and I thought that they still tasted great!*
Thursday, 23 January 2014
Pinata birthday cake
 Piñata birthday cake.
I recently made my daughter a piñata birthday cake and I thought that I would share with you how I did it.
Ingredients.
- 200g Stork or similar.
- 200g Caster sugar.
- 200g Self-raising flour.
- 4 eggs.
- 10g baking powder.
- 30g Cocoa powder.
- Chocolate fudge icing (I used Betty Crocker but you could make your own)
- vanilla frosting (again I used Betty Crocker)
- Sweets to hide inside. I used peanut M&M's, Cadbury's mini eggs and Haribo, but you can use anything you like.
Make two chocolate sponges.
- Cream together the butter and sugar in a bowl.
- Add the eggs one at a time and whisk in.
- Fold in the flour, baking powder and cocoa powder.
- Add a splash of milk if the batter is a little stiff and spoon into two greased and lined cake tins.
- Bake in a pre-heated oven on 190 for 20 minutes on the middle shelve, cooking one at a time.
Now comes the fun bit!
Once the cakes have cooled place one sponge onto a plate and this will be the bottom of the cake.
Cut a large circle into the sponge going about half way down into the sponge. Make sure that you do not cut all the way down. Then use a spoon to dig out the sponge so that you have a large pond in the middle of your cake. Then do the same for the top sponge, making sure that when the cakes go together the holes match up so the cake sits level.
Once you have your holes in your cakes you can then fill the bottom hole with lots of sweets, piling them up so they will fill the top sponges hole.
Then spread on a layer of chocolate fudge icing all around the flat part of the bottom sponge around the hole of sweets.
You can now decorate the cake however you choose to. I coloured the vanilla frosting with blue food colour to make a baby blue colour and then covered the cake in the icing. I then used some edible silver balls to make the number 16 in the middle of the cake and finished it off by adding some sprinkles.
I hope that I have made sense as I did find it quite hard to try and explain. If you have any questions then just ask and I will do my best to answer them!
Subscribe to:
Posts (Atom)